Most people practice inefficiently — they take an hour to learn something that could be done in ten minutes. I don’t know about you, but I never have enough time to practice, so I don’t want to waste time!
Before we go on, let’s present the standard approach to practicing: REPETITION!!! OVER AND OVER!!! EVEN IF IT’S NOT GETTING ANY BETTER!!! (And, it’s BORING!!)
How does that make sense? Remember, one of the definitions of insanity is doing the same thing and expecting different results! Repeating things over and over, hoping to get better, is crazy!! (I’m not talking about the drilling of materials, such as scales and chords. Once you have them perfect, you cannot have too many perfect repetitions, changing them from something requiring extremely focused attention to something that is virtually impossible to play wrong.)
Progress is your payment for practicing. If you practice for an hour, you should make an hour’s worth of progress. This doesn’t usually happen and I think it’s one of the main reasons people don’t practice — they put in a lot of time and have little to show for it. Who wants to do that? Would you keep working at a job if you didn’t get paid?? Not me!
Wasting Time
One of the best ways you can waste time is trying to learn a passage at a tempo that is too fast. You make errors and keep repeating them, training yourself to play incorrectly. It’s like trying to drive to your friend’s house but constantly taking wrong turns. You may eventually get there, but it takes WAY too long!
When you finally get serious about playing the passage correctly, you have to strengthen the correct version and unlearn the bad memories. But, they never go away — they are always lurking in the background waiting for their chance to jump in and mess you up, especially during a performance. It’s much better to have never played the passage wrong so the only way you can play it is
Maurice Andre was the most recorded trumpet player in the world; he recorded virtually every solo written for trumpet and orchestra and had to transcribe flute, oboe, and even violin music to find something new. Maurice worked on a piece for two years before recording it. I’m sure he didn’t work on it non-stop during this time; he probably practiced it, put it up for a while, came back to it, played in a recital, and then recorded it. He said he didn’t have time to learn music fast because it took too long, so he learned everything slowly and accurately from the first time he played it.
Temptation: Recordings
You may be tempted to listen to a recording to learn how a piece goes. It could save you some time! Don’t do it!! If you can’t read, you are illiterate. (That does not mean you aren’t intelligent…it just means that you can’t read.) Make yourself figure out how the piece goes and also how you think it should be interpreted. That’s the only way you will improve.
I
A piece of music can present other problems, like where to breathe, how long or short notes should be, musical nuances not written in the music, etc. Generally, there are no right or wrong answers to these things. When I’m stumped, I listen to recordings to see how someone else solved these problems. If what I hear makes sense, I’ll probably go with the performer’s opinion. If I don’t agree, I’ll do it my way. (Remember that the conductor’s opinion ALWAYS overrides your opinion. If you forget that, you may not be in the group very long.)
The Traditional Way of Practicing
The traditional approach to learning something works and works well, so we’ll discuss that before talking about a better method. The traditional method is to start a new piece so slowly that the first time you play it you have 100% accuracy or very close to it. To do that, you first need to study the music BEFORE playing it.
Check the key signature and the time signature. Look at the tempo marks so you know where you need to end up. (The tempo mark is the goal, NOT the place to start!) Check out the road map — repeats, D.C.’s, D.S.’s, codas, etc.
Look for unusual rhythms and melodic patterns. Identify scales (or scale fragments) and chords that you know. Figure out the ones you don’t know and practice them until you know them.
Determine a starting tempo — quite often, you can start at 50% to 60% of full tempo, but if you’re making mistakes, SLOW down! Use a metronome to keep you steady and start reading.
It is best to work on a small section, not the entire piece. Once you have played the section perfectly, play it again several times to make sure it sticks. (When you pour concrete, you have to let it set before you remove the molds or it will ooze all over the place.) You can then begin speeding up that section little by little (maybe 5% tempo increases) while maintaining perfection or you can go on to the next section.
BUT IT’S TAKING FOREVER!!! It may seem that way, but this is MUCH quicker than playing too fast, learning mistakes, unlearning mistakes, and finally learning the correct version. And, it will hold up much better under pressure. If it worked for Maurice Andre, it will work for you! (And it may well have been why Maurice was such an amazing trumpet player!)
The Traditional Way to a Much Higher Level — Overlearning
Susan Slaughter, former principal trumpet in the Saint Louis Symphony Orchestra, said that the process we just discussed is learning the music but it’s much better to overlearn it. When your livelihood depends on your accuracy, overlearning is a must. Here the process:
You begin exactly the same way: establish a base tempo slow enough that your playing is flawless. The ONLY thing that needs to be changed is increasing the tempo. Before you change speed, you must be able to play the music three times in a row WITHOUT ANY FLAWS. If you make a mistake, you must completely start over at that tempo. (When you can do this, you own it. If you ever make a mistake, it’s only because your attention wandered.)
Let’s say that you start out with the metronome set on 80 beats per minute (bpm) and need to increase to 104 bpm.
- 80 bpm – 3 times in a row, played flawlessly
- 84 bpm – 3 times in a row, played flawlessly
- 88 bpm – 3 times in a row, played flawlessly
- 92 bpm – 3 times in a row, played flawlessly
- 96 bpm – 3 times in a row, played flawlessly
- 100 bpm – 3 times in a row, played flawlessly
- 104 bpm – 3 times in a row, played flawlessly
So, that’s a minimum of 21 flawless repetitions. At this point you have learned the passage; now it’s time to overlearn it by repeating the process, skipping every other step:
- 80 bpm – 3 times in a row, played flawlessly
- 88 bpm – 3 times in a row, played flawlessly
- 96 bpm – 3 times in a row, played flawlessly
- 104 bpm – 3 times in a row, played flawlessly
Another 12 flawless repetitions, 33 reps so far. Now you start over, skipping two steps:
- 80 bpm – 3 times in a row, played flawlessly
- 92 bpm – 3 times in a row, played flawlessly
- 104 bpm – 3 times in a row, played flawlessly
Nine more reps, 42 total. Start over, skipping three steps:
- 80 bpm – 3 times in a row, played flawlessly
- 96 bpm – 3 times in a row, played flawlessly
- 104 bpm – 3 times in a row, played flawlessly (only one step can be skipped)
Another 9 reps, 51 total. Start over, skipping 4 steps:
- 80 bpm – 3 times in a row, played flawlessly
- 100 bpm – 3 times in a row, played flawlessly
- 104 bpm – 3 times in a row, played flawlessly (there are no steps that can be skipped)
Nine more
I should point out that the overlearning process moves along much faster than the learning process since you already know what to do. The repetitions sink the correct version into your long-term memory so that it will hold up under the stress of performance. It may be tedious, but it works!!
F
Cats and Dogs
Many years ago, animal psychologists conducted a behavioral study of cats and dogs:
A dog was placed in a room with the door closed. A bowl of food was placed in the adjoining room on the far wall. The door was opened, the dog walked into the next room, smelled the food, went to the far side and ate the food. The process was repeated until the dog was trained to know that when the door was opened there was food on the far side of the next room.
No great mystery here, but that was not the end of the experiment. The next time, while the dog was closed in the first room, a partition was placed in the second room that didn’t quite go wall-to-wall but blocked the dog from going straight to the food. When the door was opened, the dog entered the room expecting to go right to the food. Finding the way blocked, the dog repeatedly tried to jump over the barrier…without success.
Time for that cat. A cat was placed in the first room with the door closed and the bowl of food was placed on the far side of the second room. The door was opened, the cat smelled the food, went across the next room and ate the food. Just like the dog, the cat was trained to expect to be fed when the door was opened.
The partition was placed in the second room, just as it had been for the dog. The door was opened, the cat came out and saw the partition. The cat walked around the partition and ate the food.
Maybe cats ARE smarter than dogs! Too often we practice like a dog, trying and trying to jump over the wall, mindless repetition without success. We need to practice like a cat, thinking outside the box: changing rhythms and articulations to learn the music.
A Better Way
I used overlearning from 1979 to 1986. It worked very well and I would be using it today…except for the Chaynes Concerto. No matter what I did, I could NOT learn one of the passages — every time I played it, my fingers got tied in a knot. My hand looked like a giant pretzel!! That’s when I found an even better way to practice that yields great results in as little as 1/10th the time as the traditional way.
I first heard about this technique from a saxophonist in 1976. I thought it was a woodwind-only technique; in my foolishness, I didn’t even try it. Ten years later, I ran into the Chaynes Concerto. In desperation, I turned to my friend Paul Bro (another saxophonist) and asked him what to do. He explained the concept of altering rhythms as a learning technique and why it was effective. Out of sheer desperation, I tried it…and it worked!!! Very quickly I was able to play the troublesome phrase without problems.
Woodwind players use this technique all the time; sadly, it’s generally not taught to brass players. It is NOT a woodwind technique…it’s a MUSICIAN’S thing. (Keyboard players also use this learning strategy.)
I have used this technique since 1986 and found it far superior to anything else. The only thing I’m unhappy about is that I wasted ten years (1976-1986) practicing inefficiently because I didn’t even give it a chance. You can profit from my mistake or you can repeat it. The choice is yours, but I hope you will be smarter than I was.
At the 2003 International Trumpet Guild Conference, Rob Roy McGregor spoke about practicing. He said that the brain begins to shut down after about six or seven repetitions, so the idea of playing something over and over is not productive and is highly inefficient. He had written four volumes of Audition and Performance Preparation for Trumpet, Orchestral Literature Studies to address this issue. Instead of playing an excerpt over and over, McGregor composed variations on the excerpt. He said that while you were practicing the variations, you were practicing the excerpt. Some of his variations are straight forward, like the techniques we’ll discuss next, but some of them are quite subtle in their approach. If you are interested in auditioning for an orchestra, you need these books!
Standards
We’re going to look at different ways to practice. The standard of excellence you require at each step is up to you. The higher your self-expectations, the longer it will take and the better you will play. Personally, I recommend perfection. If you practice playing perfectly, then you will probably perform perfectly. If you settle for OK, then you’ll play OK. How far would you be willing to travel to hear an OK player?? How far would you be willing to travel to hear a perfect player??
Dotted Rhythms
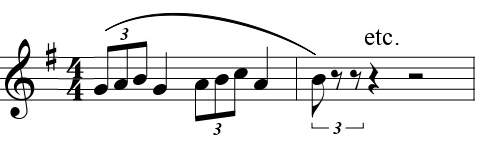
Okay, here we go! We’re going to start with duple rhythms, like eighth and sixteenth notes, and then we’ll turn to triplet rhythms.
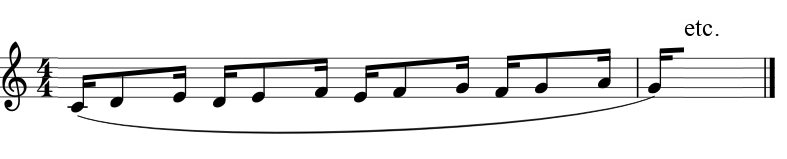
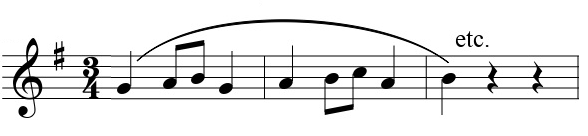
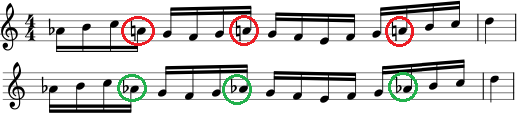
Here’s an example, using No. 39 from Herbert L. Clarke’s Technical Studies:

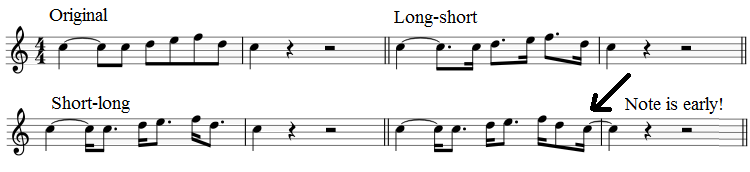
The first variation is to change the rhythm from straight eighth notes to dotted-eighth sixteenths:
By doing this, you are holding the 1st, 3rd, 5th, etc. notes longer. When you hold a note longer, you pay attention to it and it sticks in your mind. I often call this “long-short” because it’s easier to say than “dotted-eighth sixteenth.” (It’s similar to swing rhythms in jazz except that accent is on the long note and the rhythm is more jerky. You can also practice with a triplet feel and the accent on the short note for variety and experience playing swing style.)
By altering the rhythm, it doesn’t sound the same, so it’s not boring. Similar, yes; boring, no.
When you change rhythms, maintain the original articulations. By doing this, ONLY the rhythm needs to be changed to return to the music as
You must play the dotted-eighth version three times in a row without
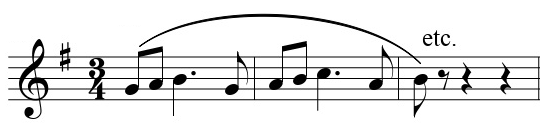
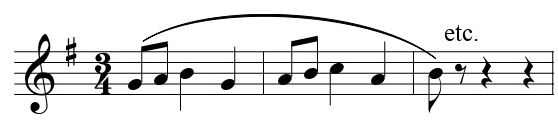
But, what about the 2nd, 4th, 6th, etc. notes?? You have to practice sixteenth dotted-eighth notes, which I call “short-long” or “anti-swing.”
You will probably find this rhythm awkward at first. I did! The cure is repetition and accenting the sixteenth note. (If you don’t play the accent, the beat will soon turn around on you with the long note getting the accent.)
Actually, the rhythm is NOT hard, it’s UNFAMILIAR. Once you learn it, it’s just as easy as long-short. Short-long is actually an old rhythm called the Scotch snap — look at the melodies that Arban included in his Method from the
Remember, you must play this three times in a row without flaw. Anything less and you are cheating yourself.
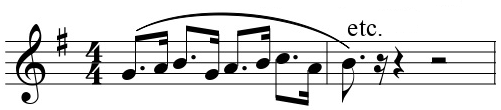
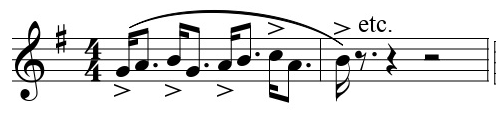
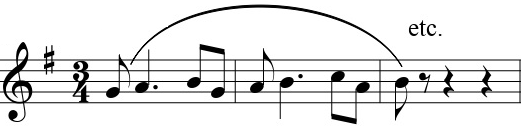
Some things are more awkward to change to dotted rhythms, like tied notes. You need to decide how YOU want to play them. Here’s an example:
Some people prefer to drop the tie in the short-long example, tonguing the sixteenth note instead. There is nothing wrong with this…AS LONG AS IT’S ON PURPOSE! If it’s intentional, it’s easy to change back to what’s written. If you don’t realize that you’re doing this, you may pick up a bad habit that transfers back to the original, making it incorrect.
Notice the arrow — MANY people syncopate the final note, playing it BEFORE the beat instead of ON the beat. When you let this happen, you risk playing the final note early when you go back to the written version.
Testing Your Self
Okay, you have successfully played the long-short and short-long rhythms without flaw three times in a row. It’s time to see if that’s enough or if you need more work. Play the exercise with straight eighth notes — is it flawless? If it’s not, you can try it one or two more times. If it’s still not flawless…
STOP! You do not want to undermine your self-confidence by making mistakes. So, go back to the dotted rhythms again, both versions, three perfect reps each. Test the straight eights again. Flawless?? Hooray! You’re done!
Not flawless?? Back to work on the dotted rhythms. Repeat this process until you have it perfect, or you start feeling bored, which means you’re losing focus and practicing inefficiently. We’ll move from dotted rhythms to practicing groups of four, but before we do that, two things:
Greater Accuracy with Long-Short Rhythms
First, I find it very interesting that many times you will immediately be more accurate playing long-short rhythms than straight rhythms. I believe that is because you are able to look ahead during the long note and see the next two notes before you get to them.
That’s probably the secret of slow practice — play something slow enough and you can play it correctly the first time. Unfortunately, most of us don’t have the endurance or determination to practice like the world-class violinist Isaac Stern. I was told that Mr. Stern played so slowly that he held each sixteenth note for four beats, 1/16th of tempo! How could you ever miss a note? Talk about building your confidence!
Triplet Variations
Second, let’s look at the triplet rhythm variations. Here’s a pattern followed by three variations, each of which holds a different note of the triplet longer:


This last rhythm is frequently found in ragtime music by composers such as Scott Joplin.
Update #3 – I devised several more practice rhythms last night:


Groups of Four
Groups of Four
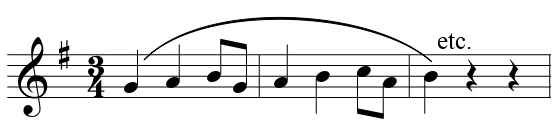
Back to duplets. You’re getting bored with the dotted rhythms, so it’s time for something new: groups of four. Each of the four notes will be held longer than the other three.

The long 1st and 4th notes are easy patterns; the long 2nd and 3rd take a little longer to become comfortable, especially the syncopation in the long 2nd note pattern.
You can also play four-note groups in a waltz pattern:
Of course, you can make up your own patterns and that’s part of the fun.
MOST of the time, changing rhythms will solve the problem. Unfortunately, there are passages that don’t succumb to this onslaught, so we turn to
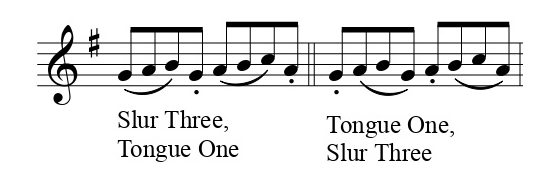
Changing Articulations
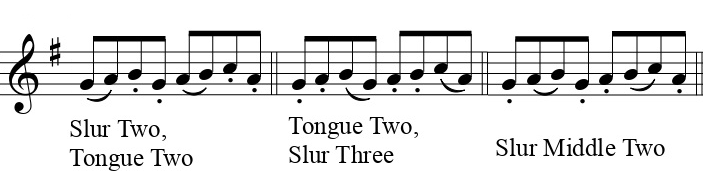
Besides learning a difficult passage, it is good to practice different articulation patterns so that you are already comfortable with them when they show up in a piece of music.
In discussing rhythmic alterations, we discussed that by holding notes longer we pay them more attention and they sink in better. Changing rhythms gives us more variety so that we don’t get bored and can put in more repetitions. Changing articulations also minimizes boredom and allows us to put in even more reps.
HOW MANY REPS DO I NEED???? THIS IS CRAZY!!!
Sure is! How many reps do you need? It depends on YOU! If you’re having problems, you need more reps. If you lack confidence, you need more reps. If you never make a mistake and have confidence in your ability to play flawlessly in public, you don’t need more reps.
The number of reps for a given passage will vary greatly from one person to the next, and it’s going to change as you age — the longer you’ve played, the more reps you’ve put in along the way, so things may happen faster than you expect.
By changing rhythms and articulations, you will be able to play MANY more reps than if you simply played what’s written. And, you will learn it MUCH better. If you REALLY want to put yourself through it, change rhythms AND articulations at the same time!
Okay, here are some articulation variations:
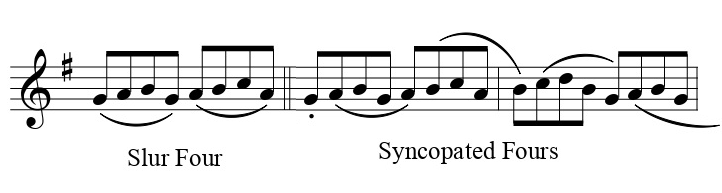
The syncopated fours show up a LOT in the Charlier 36 etudes

The syncopated pairs is used EXTENSIVELY by jazz soloists and is definitely something that should be practiced.
Next to Last Resort — Additive Technique
This next technique can take a great deal of time, but you will not be bored. I call it the additive technique — I learned it from Clayton Harris who learned it while playing lead with the Madison Scouts. It will obliterate virtually any challenge that comes along.
It’s a bit hard to describe; basically, it boils down to playing every:
- 2-note combination
- 3-note combination
- 4-note combination
- etc., etc. until you finally play the entire passage.
Here’s an example:

If you work your way through the entire exercise, it will take a great deal of time — there are 33 notes, so there would be 32 steps in the process. It involves a LOT of repetition and that is what burns the exercise into your brain.
Once you get the hang of this, it’s not hard. But, it can be confusing when you first try it: it’s easy to get lost. That’s okay — just keep going. The more you do this technique, the easier it gets.
(Perhaps you don’t need to work all the way through every step, and maybe you will. It’s a judgment call; only you can decide when you own the exercise.)
Additive Groups
I use a modified version of this — additive groups. It’s the same process, but you substitute groups of notes for single notes. First, you practice the individual groups and then you begin combining them. Here’s how this would be applied to the Clarke Study:
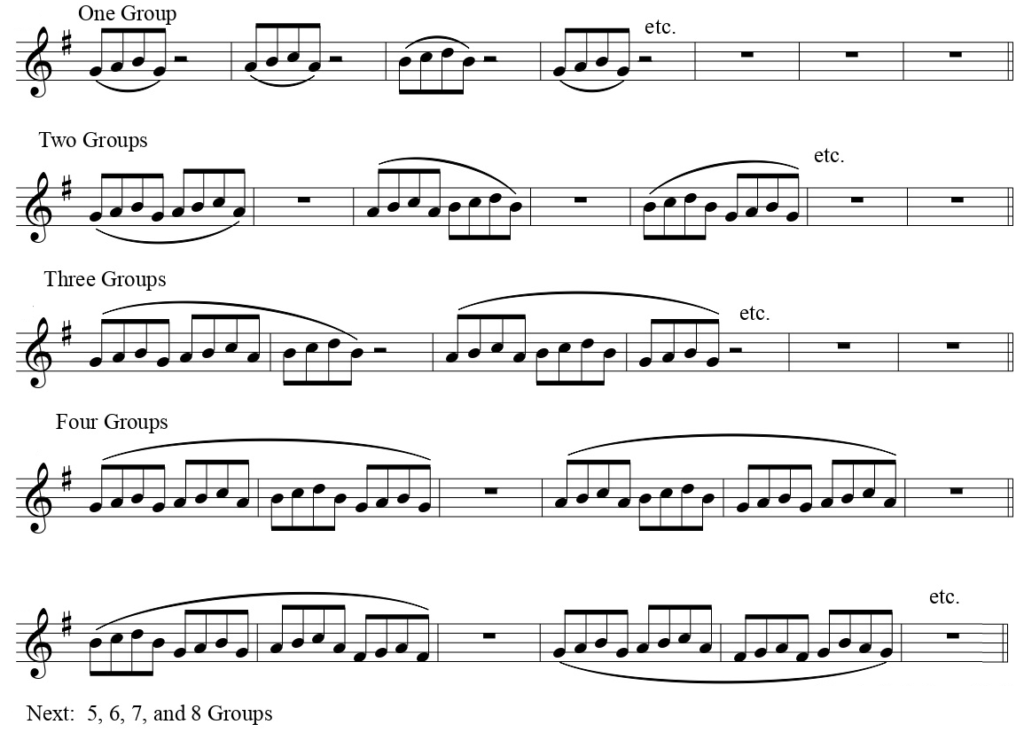
This is less tedious than using individual notes and I find it to be quite effective. If you try this and it doesn’t do the job, play the note-by-note version.
Coupler Notes
Update — while practicing last night I remembered an important addition to practicing with note groups: coupler notes. I learned this concept in the Kent Kennan book on orchestration. In making transcriptions, there are two ways to split technical passages:
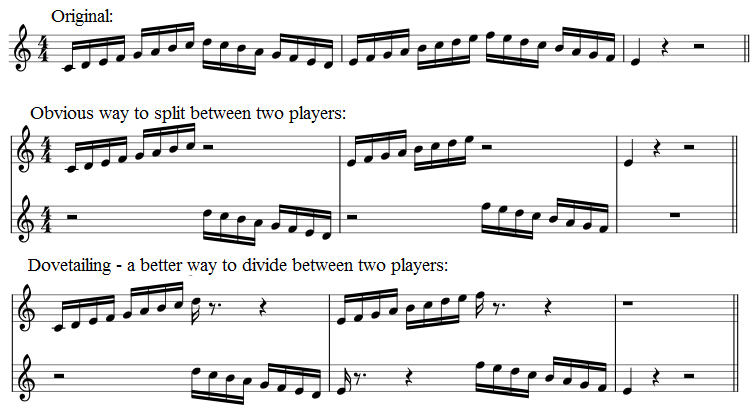
Dovetailed parts are MUCH easier to play. Try playing this with a friend and you’ll see what I mean.
When practicing groups, always end with the first note of the next group — it’s easier to end on a beat, your rhythm will be more accurate, and you’ve trained yourself to know what the first note of the next group will be. It’s like couplers on train cars — the couplers hold the cars together. Coupler notes hold the passage together. (And, they are the target notes — see below.)
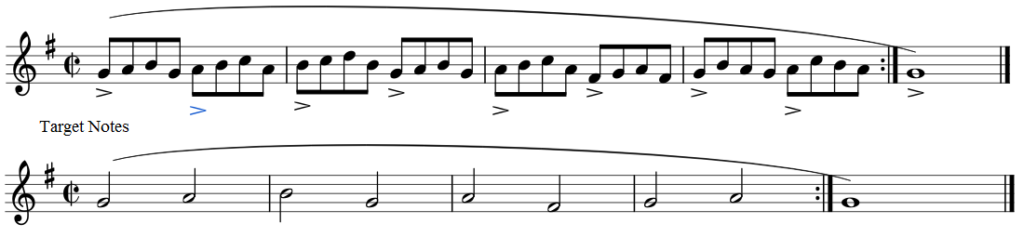
Target Notes
Practicing groups of notes leads us to target notes. It is easy to get lost during long runs — it’s almost like you’re trying to play all the notes at the same time — which doesn’t make sense. Think of a long musical run like a 200-mile journey: you drive the first mile, then the second mile, etc. Very likely you’ll stop several times, so your goal is to reach the first town, then the next town, and eventually you finish the trip. So, you play the first note, then the second note, etc., repeating until you reach the end.
Since you can only play one note at a time, it makes sense to focus on short sections of the run, playing them in sequence until you reach the end. To do this, you need target notes: the first note of each beat. Make sure you nail the note and that it is precisely on the beat. What about the notes in between? Just make sure that they are rhythmically accurate and they pretty much take care of themselves.
I find that it often helps to practice just the target notes, omitting the notes in between. Repeat until it’s rock solid and then give it a try with all the notes — and be sure you focus on the target notes. The target notes are like the foundation of the music — everything is built on them; the stronger the foundation, the stronger the building.
Not only are the runs easier, but your rhythm will also improve. Playing with rhythmic accuracy is extremely important:
- the music sounds better
- since everyone in the ensemble is accurate, individual parts line up correctly
- your coordination is better, so everything is easier to pay and sounds better
Reverse Additive
Update #2 – While practicing last night I also remembered another technique: the reverse additive. This was inspired by Susan Slaughter who told me that most people start at the beginning of a piece, play until they make a mistake, and go back to the beginning. What a waste of time — playing what you already can. It’s like thinking you can get up enough momentum to leap across the trouble
By the time you’ve worked up the entire piece, you’ve played the beginning hundreds of times and the ending tens of times; when you perform it, you start out confidently, but the longer you play, the less confident you are. So, she starts at the end of the piece and works her way back to the beginning; the longer you play, the more confident you are.
To use the reverse additive process, play the last note. Back up one note and play the last two. Back up another note and play the last three…etc., etc. This is another time-intensive approach, and it works.
Update #4 – BEFORE you use this technique, look at the entire measure for accidentals carrying through the bar. For example,
In the first line, you will notice that the very first note is F-flat. If you use the reverse additive technique, you start with the final note (D). As you work your way back, you will play A-naturals the entire time (unless you have examined the entire measure) until the last time through. Oh, my! That’s A-flat, and it carries all the way through the bar. How many times have I played it incorrectly???
Let’s figure it out — assuming you never repeat, you will have played the first “A-natural” wrong three times. The second “A-natural” will have been played wrong seven times, and the last “A-natural” thirteen times. That’s a LOT of bad memories you have to erase — it would be so much easier and save so much time if you had spent a second or two looking at the measure BEFORE you started the reverse additive. Be sure you do this for EACH measure you practice!
Note: How do I know this?? Because I’ve done it the WRONG WAY too many times!! There is very little that you can do wrong that I haven’t already done incorrectly. You can profit from my mistakes or repeat my mistakes. (Which is a waste of your time!)
Oh, No! Even the Additive Techniques Didn’t Work!!!!
There’s nothing you can do except go back to the traditional way of practicing. You might as well overlearn while you’re at it — it doesn’t take that much more time.
That’s the bad news. The good news is that I have only had to go back to the traditional way a very few times in the 33 years since I adopted altered rhythms. How many?? Probably only 3 or 4 times.
I will admit that I occasionally chose the traditional way just because I feel like it, NOT because the altered rhythms/articulations or additive techniques failed me…I just want to do something different.
One Decision or Many??
I don’t usually talk about this, but there is a hidden benefit to all these approaches — you don’t have to think very much. WHAT?? THAT’S CRAZY!!
Nope. Here’s what I mean — let’s say you’re practicing and run into a challenge. You can stop and analyze what’s going wrong and create lots of ways to overcome the issue. That takes a LOT of brainpower!
Or, you can say, “Oh, oh. That’s a problem spot. Let’s try the altered rhythms.” One easy, quick, simple decision. You can use all the altered rhythm variations, probably for 20 or 30 minutes, and the only decision you have to make is: “Did I play it correctly?” That takes almost no thought.
Still having problems? “Let’s try the articulation variations.” One decision for 20 to 30 minutes of practice. “Hmm. Guess I better do the additive techniques.” Even
Total practice time – over two and a half hours. Decisions? Four.
You may think I’m crazy to bring this up, but Henry Ford (founder of the Ford automobile company) said, “Thinking is the hardest work there is, which is probably the reason so few engage in it.” Last night, I was so tired when I finally got to practice that I could barely think. I decided 15 minutes was all I could stand, which is NOT a good way to maintain endurance!
So, I started practicing, found a passage that I wanted to go faster, and started using the additive groups. Boom! I was past 15 minutes. I found a passage that I’ve never played well. So, I used the reverse additive technique (and at a slower tempo) and ended up practicing 40 minutes. Both passages ended up MUCH better. So, I wasn’t too tired to practice last night — but I WAS too tired to think.
Remember this, your muscles only know two things — they’re getting stronger or they’re getting weaker. If you don’t practice, the muscles don’t care about all the great reasons you have — they get weaker.
YOUR Choice!!
So, are you going to practice like a dog or a cat? Are you going to accomplish an hour’s work in 60 minutes or settle for less? Are you going to maintain or even improve your playing? The choice is up to you!!